Thursday, November 29, 2012

Decorating Notebooks

 I joined a ladies bible study...and we get handouts to take home; they're 3-hole punched.  I really wanted something purty to keep 'em in,  I have plenty of 3 ring binders lying around.  So, I took a black binder and started gluing on pages from an old book using stick glue. I glued them onto both sides and then embellished a little.

Not as good a picture as I'd hoped.  I used blue floral stickers and a few others,...and then wrote Phil. 4:3.
   
Close up of center.


The back.

I also needed a new idea book, a journal that I can sketch my ideas in.  This time I grabbed a composition book and some more book pages.

Ugly composition book.
Glue pages on and trim edges.  Black washi tape with white polka dots. Bits and pieces from books, magazines.
Here it is... I used a picture I copied from an old book and letters I cut out from magazines.  Can you see the letters at the bottom?  They read: Bright Ideas

Hopefully that is just what I will log into this journal; bright ideas.  I really love journalling...

Inside.... See the first page?  That clock is on the agenda!  It's a page from a Pier 1 catalog.  I have been dying to make that clock. ....Next time maybe?
 

Sunday, November 18, 2012

DIY Saddle Shoes for a 50s party

So, my friend's 50th birthday is coming up and her daughter is having her a 50s theme surprise party.  WooHoo!  This is gonna be fun.  First things first, I AM BROKE!  That means no funds for this project, everything has to be made from home.....


Today I pulled out an old pair of slip on shoes that were destined for the garbage.  First, they were in such bad shape I had to stitch up the back seam on both shoes.  Next, I started painting.
Well, it's not necessarily a BEFORE picture.  After I started painting the first coat of white I remembered to take a picture. I painted both shoes with two coats of white acrylic craft paint.
Here is the finished project.  What d'ya think??
After the white coat, I looked up some images online for saddle shoes and painted the black parts.  It really doesn't take too much talent!  Next, I dipped the end of my paint brush into white paint and used it to make dots for the shoestring holes and for the decoration that goes around the border of the black.  Then, I painted lines for the shoestrings.  For a realistic touch I tied some white yarn into a bow and then sewed it onto the tops.  Voila!  Homemade saddle shoes. 

Halloween Party


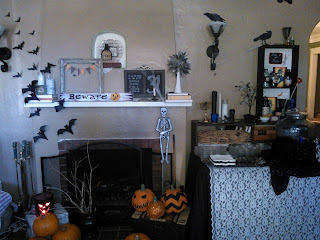
This is my fireplace (obviously, duh).  The bats flying out were from an idea I got on pinterest.  I got the bat idea from so many places; saw it all over pinterest, on some of the magazine websites (CountryLiving.com) and a similar version at thriftydecorchick.blogspot.com .  I just drew my own bats and cut them out, but there were several places to print out templates if you need to.  The BEWARE sign was an old board that belonged under a bed at one time.  I just painted it and drew the letters on with a Sharpie.  I think in this picture I am most proud of my pumpkins;  The three on the picnic basket.  I made them from paper mache.
Here they are close up.  I think they're my favorite because of how easy they were.  It made me want to make tons of paper mache things....  Anyway, all I did was wad up a bunch of newspapers until I had the size I wanted, then I whipped up some flour and water, ripped some newspapers into strips and went at it.  Super easy as far as crafts go, just a little time consuming.  When they had dried for a day, I put another layer of paper mache on to make them thicker, more durable.  When that dried I painted them with acrylics.  I wanted one Jack O Lantern, so that was easy.  I think I saw the zigzag pattern somewhere on the web, and I asked my daughter what to do with the third one and glitter it was!  I think they turned out awesome for how little they cost me.
  I bought the crows somewhere last year,...I think they were Martha Stewart decor.  There is a little black tree in there, it use to be an "Easter Tree."  I never really liked it.  So, I spray painted it black and put some web and spiders on it.  I used a black sheet and some white lace to cover the table on the right.  It was used for the drinks and plates.
  The little hanging skeleton was a sticker set that I bought at the craft store, stuck it to black craft paper, cut it out and put together with brads.


I love this double frame.  A friend gave it to me years ago.  I drew on some black cardstock with whiteout and put it into the frames.  The phrase on the left I got from pinterest....khpinson.blogspot.com.  And the 31 I drew and then wrote spooky words inside the numbers. 

Lighting was bad, yikes. Sorry, it's the only pic.  The little cat and rat cut outs came from an idea I got while looking at MarthaStewart.com.  The specimen jars were on CountryLiving.com....I put gauze inside the doors of the buffet and stuck spiders on it.  I made a couple banners...they're always a great way to give a festive look. 
 Specimen jars, the one in the green goo is one of those animals you can buy at the dollar store that "grows" once in water.  I colored the water green with food coloring.  The tiny cloche in the front is a broken candle holder (top) setting on an upside down candle holder. 
More specimen jars. 
Center of the buffet.  The Trick or Treat sign came from: graphicsfairy.blogspot.com.  Instead of framing it, I matted it on some Halloween paper and put it on the front of a book (after I turned the jacket inside out).
Aww, ain't Charlie cute?  Our Bassett Hound was enjoying the decorations too.

I found this chandelier at a thrift store for $12.  Spray painted it black and hung it above the table.

My daughter added the spider webs for me....she's pretty good at spinning webs!!

I really have fun planning, crafting and decorating for a party...it takes my mind off of all my problems and worries for a little while and gives me a fun goal.


I got the idea of using a dry erase marker to write on glass/mirror.  On this picture I drew horns, masks and other oddities.  I liked the idea so much I wrote messages on all the mirrors in the house.  The first message was REDRUM, but I had to change that one because it freaked my husband out.  So, I picked out some other cute phrases from the internet and wrote them on our two big house mirrors.  On one I wrote: "TRICK OR TREAT is not a greeting, it's an ultimatum" from a picture made on landeeseelandeedo.com.

This was a fun last minute addition. I mixed two different colors soap.

My daughter said that it didn't look right because the label says, "Toad Bladders" and there was nothing in it that looked like toad bladders. SO.... I looked around the house and found some peanut shells and dropped them in.  Looks gross, right?  Got the labels from:  https://docs.google.com  They looked so good that I took some old glass jars and spray painted them black, then added some more of these labels. 
Here they are displayed in an old drawer that  I covered the back (bottom) with book pages and painted  black.  This was fun!  Thanks for joining me.

Monday, November 12, 2012

Party, Party, Party!!!

No excuses.  I started this blog to share crafts and inspire creativity within myself and others.  So, for my neglect of this blog, I sincerely apologize.  I will try from this date forward to blog once per week.  I think that's doable!
Now, to catch you up:  Since we last visited with each other I have been busy with parties!  We had two parties here at the house for my niece's kids.  The first, a monkey party for her four year old son, Chris, and a princess party for the baby girl, Maddie.

In my last post I showed you the monkey pictures I was making for Chris' party.  Let me show you a few pictures:

Here's the birthday boy.  Notice the silly girl in the back?  That's my youngest, Abbie.
These are pictures of the family as monkeys that I painted.
Fruit, cake, banana pudding and lots of bananas served.
And, of course, you already saw these....
I am guilty again for not taking many pictures. :(  Next up, the princess party!
Here's the princess, Maddie.  She traded her crown for a hat and kicked off her princess heels...just as I would do.
One area inside; I used cereal boxes to draw a castle, taped it to the mirror,....draped some banners, brought out all things pink.  We had strawberry lemonade for refreshments.  You probably can't see it, but the shoe I made from paper is sitting on the pink table. 
More pink, more banners,...
I love writing on this chalkboard for special events.  I made it out of an old cupboard door.  I just painted it white, distressed it a little, then, painted the center black.  You know, you don't have to use chalkboard paint for a chalkboard!  I just use good ole acrylic craft paint.  The trick is to "prime" the surface by gliding over the dry black painted area with the side of the chalk.  Once covered, wipe with dry cloth.  Done!
The front porch.  We used boas for banners and old sheets for tablecloths.
I won't bore you with all the food pictures.  Honestly, I hate food pictures because they never look as nice as real life.  We used cupcake liners to load individual servings of Muddy Buddies.
We served tea sandwiches of chicken salad, lots of cookies and goodies, and Maddie's favorite snack of pretzels and ranch dressing! 
These were so much fun to do and I honestly irritate myself because I never think to take pictures of all the decorations when I'm making them.  Next, our Halloween party!