Tuesday, May 29, 2012

Easy Lotus style paper flower tutorial

This is such an easy flower to make!  Definitely a project for beginners. 
Supplies.
You will need:
  • one old book to pull pages from
  • scissors
  • 18" long floral wire
  • floral tape
  • pencil
First tear some pages out of the old book.
 (Let me take a moment to say that I love books.  I really do.  I love the way they look on the shelf, the way they smell, they way they feel.  That being said, I have no qualms tearing one up now and then.  But, the one that I choose to use for craft is usually a duplicate of one we already have, one that I would never recommend and therefore will not keep or give away, or one that is already in sorry shape.)

Fold in half.

Fold in half again.
Draw flower in pencil.  I used marker so that you could see it.
Cut out.
Loop end of wire.
Poke wire through middle of flower cut out and pull up to loop. Pinch in place.
Wrap with floral tape to secure.
Add another "cut out" by poking wire through center and pulling over first one.  Wrap base of flower with floral tape.  Continue adding the "cut outs" onto wire and securing with floral tape until you reach desired fullness.  I usually only use 4 or 5 "cut outs."
Finish lotus flower by wrapping the length of wire with floral tape. 
Here I have mine displayed on the fireplace mantel.


Bonus!  These are awesome to use on your old Christmas lights for a whimsical display.  You just cut out as above and then cut a small X in center.  Slip bulb through, pull paper down to where it isn't touching bulb, attach with floral tape.  My daughter has these in her bedroom. 


Napkin Rose tutorial

You will need the following supplies:

  • floral wire, you can buy it in 18" lengths like mine
  • floral tape
  • Napkins ( not the cheap kind you get for less than a dollar!  got mine at Target)
  • for napkin rose only: brads/paper fasteners & small 1/2"-1" flowers
  • Optional: old  greenery for the leaves  (I buy the cheap bunches of flowers at the dollar store and then take them apart for other crafts, use the leaves for this craft)

First cut out circles.  Lots of them.  I have a 2 1/2" circle punch that I use for paper roses but it's not advisable to use it with napkins because it will dull the blade.  However, after using it to punch some paper circles you can then use one of the circles as a pattern for the napkins. 

First, I am going to show you how I make napkin roses.  I already have some circles cut out,...some of them have Xs and Os because we used stamps on them for a Valentine's Banquet a few years ago.  Which leads me to another great idea: you can stamp any design you want onto the napkin/paper before making them into roses.  The options are endless if you use your imagination!

Here's a picture of my circles cut from red napkins:

Next, put brad through center of small flower and attach floral wire to brad by wrapping it around brad and then folding the bradfasteners down over wire.  It will look like this:
front
back: can you see the wire wrapped around the brad, then the fasteners are folded down?
Now, we are ready to start adding petals.  Take the first petal, a circle you have already cut, and fold the bottom 1/2 around the wire, placing the flower in the center.  Like this:

Wrap petal around wire like this and begin attaching with floral tape.
To use floral tape, cut or tear off a lenghth of tape.  Wrap tape around petal and wire while pulling taught.
If you don't pull/stretch the floral tape a little as you wrap it, it won't cling. If you've never used it before, you may want to practice a little.  After the petal is attached securely and you have wrapped the floral tape around the wire a few times, cut or tear tape and begin adding more petals.

I added 2 this time.

Continue adding petals in the same fashion; 1 or 2 at a time,  wrap the bottom portion of the circle around the stem of the rose and then attach using floral tape.
Here's my progress:

This is about as big as you can go with this process. It is fine to stop here and make several this size.  They are very cute; about 3"-4" in diameter.  However, if you want a bigger rose, which I do, you will have to:                                                 cut a few 5" lengths of the floral wire and start making individual petals to add to the rose.  So, with my first 5" length of floral wire I made a 1/4" loop at the end and then attached 2 petals using the same method we have been using floral tape.  (If you don't make the loop at the end of the wire before attaching the petal it will slide right off!)  I made 6 petals like this.
Here is what they look like:


Now, we will add each one of these individual petals to the rose using floral tape.  Just place the petal where you want it, align the stem of the petal with the stem of the rose and attach with floral tape.  Easy peasy. 
adding a petal on it's own stem
here is the back of the rose after I added 4 petal stems, almost done!
and this is the front after adding 4 petal stems
I initially intended to add only 6 of these individual petal stems, but I am adding a few more to make the rose more full.  Here's mine after adding 10 petal stems:

almost done, needs leaves
use old greenery or cut leaf shapes from green mulberry paper
I used leftover leaves from old greenery
attach to indivdual wires like we did the petals


cut excess wires
if you want the rose to have a long stem (for a vase) wrap all of stem with floral wire
if you don't need a long stem, cut it off at desired length and wrap accordingly
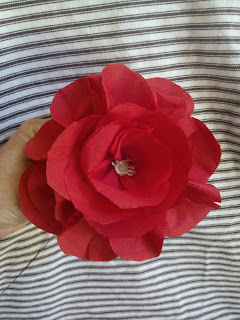
here's the finished rose
And here it is displayed on my mantle:


What do you think?


Monday, May 21, 2012

Thank you Sis!

Page 48 of  Country Woman Magazine June/July issue features my Patriotic Fabric Wreath and Flag Banner!! But, I guess you really can't brag when your sister is the Craft Editor! And she is simply fabulous. I am so proud of her...and this opportunity. <3

Page 28 with a close up of my wreath, and page 29 shows 2 more banners I made.  WooHoo!

Sunday, May 20, 2012

Desk Drawer into Thread Display Shelf tutorial

Okay, my friend, Sharon, recently got rid of her desk.  I begged her to keep all the drawers because I love using them for craft projects! This project came from the large narrow drawer that's usually at the top middle of the desk.


Here's what I did:

Take one ugly drawer.

This is the before pic of the drawer.  It has a white bottom because I initially intended to make it into a chalkboard and began painting it for that. 
Take out the built in organizer/pencil holder if there is one.  I was banging and banging on this thing and then my daughter said, "Mom, you probably have to take out a screw."  I told her I already checked and there isn't one, and when I turned the drawer around to show her, there it was!  Wow.


Pick out papers to decorate the back of the drawer. You can use scrapbooking papers, papers ripped from a magazine or old book, encyclopedia, or music sheets, maps or.....virtually anything.
Paste papers down.  I used stick glue, but you could also use Elmers.

Next, add shelves.  You can measure the size you need and at Home Depot they will cut the wood to your dimensions for free  I had some scrap wood in my garage and cut it down to size.  Unfortunately, this part I cannot give specific dimensions/instructions.  It depends on the size of your drawer. Paint shelves if desired.  I left the outside of my drawer unpainted, but chose to paint the shelves green
Add shelves.  I cut them to fit and then used finishing nails to secure them in place.
 Once shelves are in place, the job is pretty much finished.  Add a saw tooth picture hanger on each side of the back.  Hang on wall and add thread!  This would be a cute idea for any small displays 

Tuesday, May 8, 2012

Book Paper Roses

My neice, Amanda, called with a craft emergency!  It's teacher appreciation week at her babies' school and she had an idea which she needed paper flowers for.  So, Hannah and I got busy at the last minute and made 7 of them.
Here's what we used: book paper, circle paper punch, scissors, tape (I used white painters tape), green floral tape, and floral wire stems..
I used a 2" circular punch but you could just cut the circles out with scissors.  First, I folded 1/4" of the wire over to make a loop (so that the petals don't just scoot right off the end of the wire). Take each paper circle and fold a small piece down, this is the top of the petal. Then, take the first paper circle and fold around the folded  part of the wire (with the small fold at the top) and tape into place.  Take another paper petal and wrap base around the first one, tape to wire. Continue in this same way wrapping each paper petal around the last one and taping in place. As the rose get bigger, you will begin to tape the next petal to the last one....if you don't do this (if you continue to tape the petals to the wire) you will end up with a paper pinecone instead of a rose!  Once the rose is as full as you want it, tape well around the bottom.  Next, wrap the stem with green floral tape....and voila!


Tuesday, May 1, 2012

Special Box "book"

I have seen "faux books" at several stores lately.  Michael's craft stores sells them.  The small one costs $11.  I also spied them at TJ Maxx for around $6.  However, I am usually not one to purchase something that I think I can make! 

I have been thinking about making one for a couple weeks now and finally gave it a go.  I keep a stash of cereal boxes on hand for craft projects.  They are the perfect thickness for so many crafts (this might be a topic in itself!) 

Here are the supplies.  I also used a hot glue gun and varous scrapbooking supplies.
Front
First I taped the top and bottom closed.  Then, using an exacto knife I cut the front so that it opens.  Then, I cut two pieces (slightly larger than the front of the box) from and old Fed-Ex box.  These are to strengthen the front and back of the faux book.  I glued one to the front and the other to the back using a hot glue gun.  Using white glue I covered the entire thing with pages from and old book.  After it dried, I added embellishments, a ribbon for a closure and a button to cover the ribbon end.  This is the result:
Side


I am not entirely satisfied with it, but it was just an experiment.  I'd like to make another using paper mache' over the cereal box.  Another time perhaps.

Inside
My daughter likes it.  She has several "special boxes" to store treasured momentos & memories; this will be perfect for that.